|
|
|
Jensen Monday Club |
|
|
| The purpose of this project was to see if more performance could be achieved by modifying the ignition advance curve. The answer is yes, but it will mean buying a custom modified or adjustable distributor. Below Is the experimentation we did to find out if the altering the advance can improve performance. No questions about it, it improved power and economy, but there is no means of limiting "total mechanical advance" in the standard distributor, so we couldn't stop the engine pinking. There is a second article on the Mopar Performance distributor I brought which allows you limit the amount of total advance. If you are familiar with the principles of advance, then click here for adjustable distributor The "advance curve" of the ignition system can affect how the engine performs. To little advance, and the engine will be sluggish. To much and it will create "pinking" (also known as "Pinging", "Spark Knock" or "Detonation"). Whatever you call it, it is very bad news and you must STOP Immediately you hear it. It occurs BEFORE you can hear it, and by the time you do hear it, it is very advanced so BE CAREFUL. For a detailed explanation of the advance curve click on the link. For a brief explanation, read on. When the spark plug ignites the fuel in the cylinder, the fuel takes time to burn fully, and the gas this burning produces takes time to fully expand. This happens in milliseconds, but even at idle the pistons are travelling at hundreds of feet per second. Because of the time needed for the fuel to burn, and because of the speed of the pistons, the spark plug fires BEFORE the piston reaches the top of it's stroke. The top of the stroke is called TDC (Top Dead Centre), and the point at which the spark plug fires is called BTDC (Before Top Dead Centre) Because the speed of the fuel burning is fixed, it needs to be fired earlier as the engine speed increases to allow it more time to burn fully as the pistons are travelling faster. This increase at the point at which the plug is fired is called "Ignition Advance", and the rate at which it is advanced is called "The Advance Curve" Due to the compression of the fuel in the cylinder, the cylinder pressure reaches such a level that the fuel can ignite itself, rather than the spark plug igniting it. This is "Pinking" The things which affect cylinder pressure are:
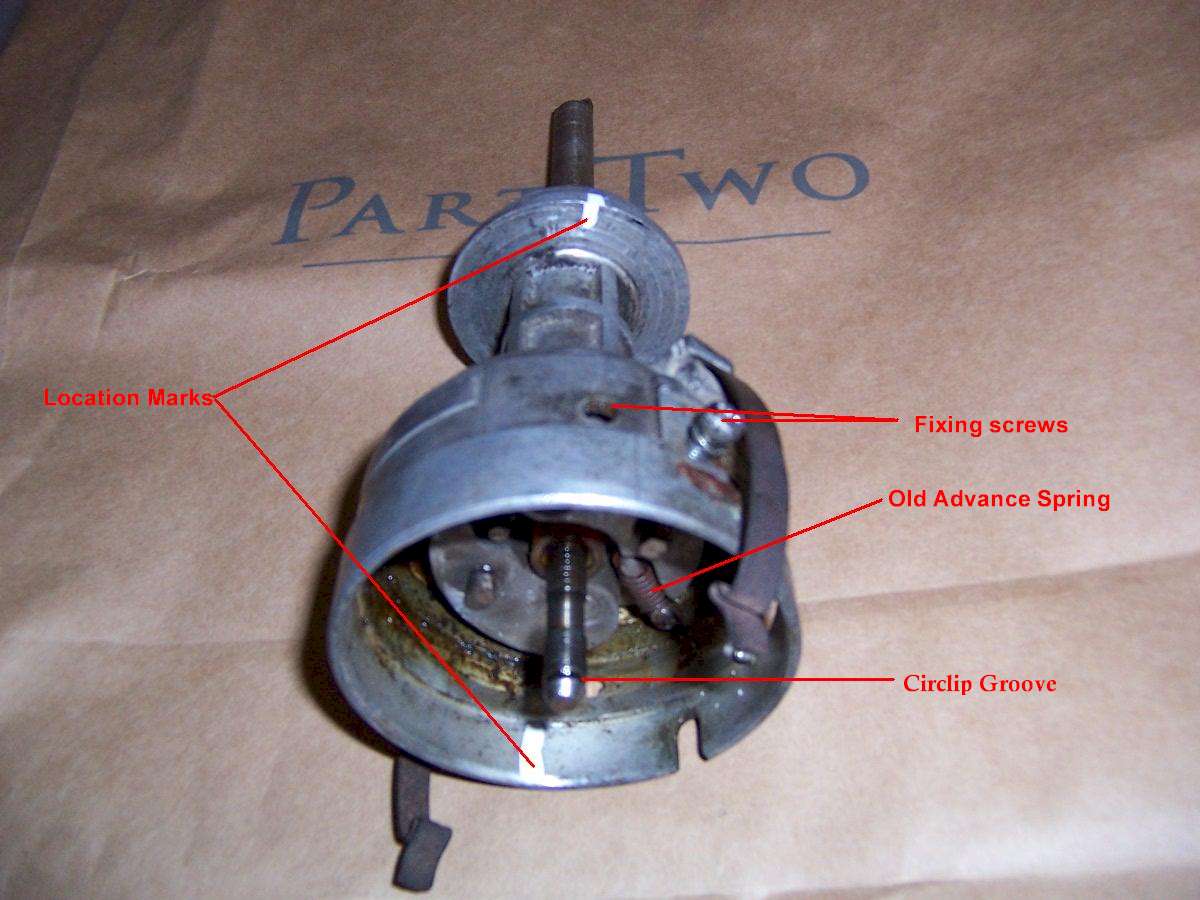
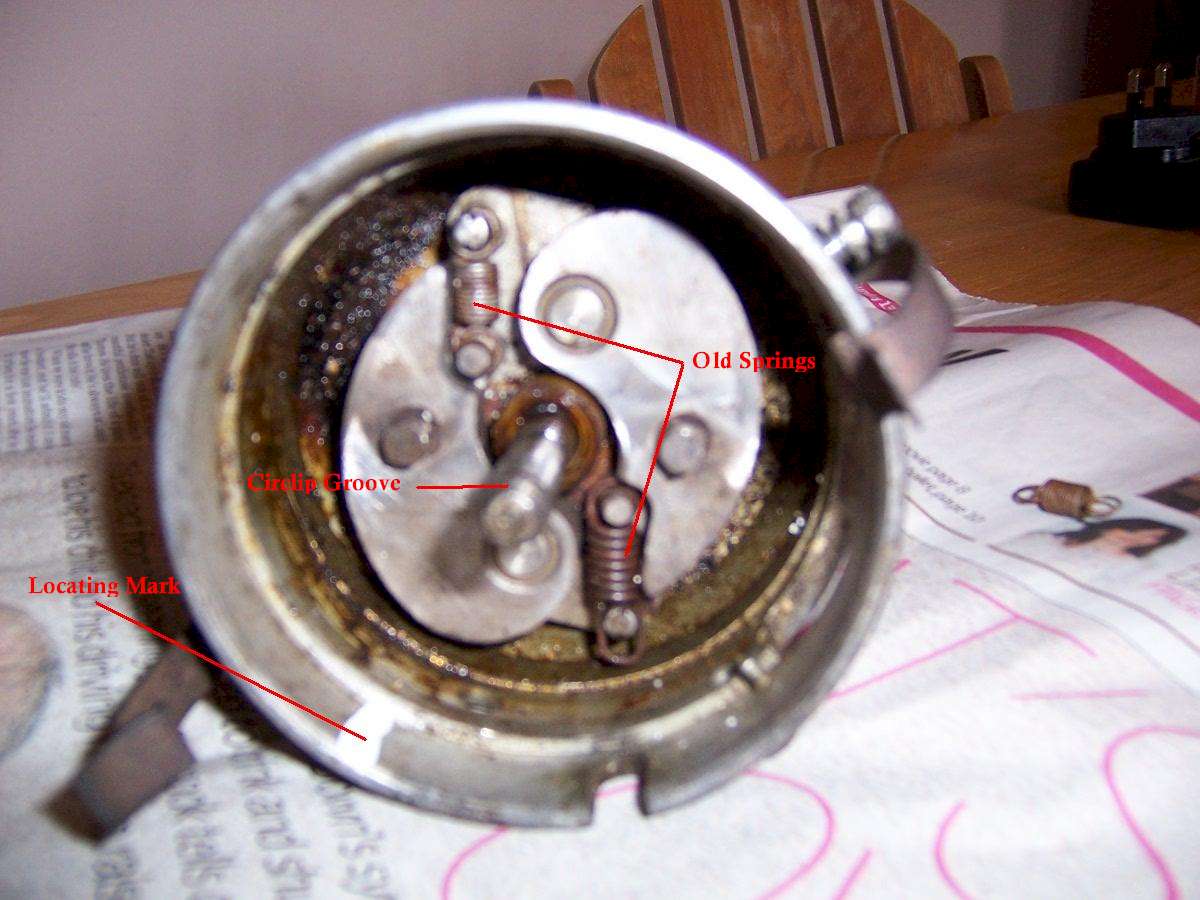
Low octane fuel will self ignite sooner than high octane, and so cause pinking. With a lot of ignition advance at idle, the starter motor will struggle to turn the engine. This is due to this increased cylinder pressure. The other cause of pinking is when there is so much ignition advance that the burning fuel hits the piston on the way up, rather than pushing it on the way down. This collision of the burning fuel onto the piston is the cause of the "pinking" noise, and whether through excessive ignition advance, or self ignition of the fuel, is very serious. In a standard distributor setup, there are 2 means of ignition advance. The first is "mechanical" and is caused by weights in the distributor being pushed out by centrifugal force as the distributor shaft is rotated by the engine. The faster the engine revs, the more the weights move out, advancing the ignition timing. The rate at which the weights move is controlled by the advance springs. The other method is "Vacuum" advance, where a pipe from the carburettor to a canister on the distributor causes the vacuum generated by the engine to suck on a diaphragm in the distributor, advancing the ignition. This is only available on "Cruise" when the engine is producing high vacuum, and the cylinder pressure is low due to only partial opening of the throttles. It is not in operation during hard acceleration. "Static Advance" relates to the ignition timing at idle. "Total Mechanical Advance" the the amount of advance that the distributor weights create ADDED to the static advance, i.e. "Static Advance" + "Mechanical Advance" "Total Advance" is "Static" + "Mechanical" + "Vacuum Advance". Experimenting with the static timing on 136-8779 gave very noticeable improvement in acceleration and throttle response. Changing from 10 (standard 440 static timing) to 14 degrees static timing at idle made a huge difference. You need to be careful adding static advance, as what ever you add here is added to the total mechanical advance, i.e. with all the mechanical and static advance included. The point at which maximum advance is reached is another deciding factor in the engines performance. The standard 440 distributor gives maximum advance by 2600rpm. The distributor fitted to the Six Pack or Magnum engines gives maximum advance at 1700. This will make a stock 440 much more responsive. Changing the standard 440 distributor for a Six Pack or Magnum model is a quick easy performance upgrade. The distributor fitted to 136-8779 already had the Six Pack advance, so for more aggressive advance curve, a set of Mopar Performance advance springs were purchased, Part number MOPP2932675 It was obvious on opening the packet that these springs were of a much lighter gauge than the standard springs, which will allow the centrifugal weights to spin out and advance the ignition much quicker. If you are lucky enough to have low fuel prices (like the USA), then not using vacuum advance is not a problem (vacuum advance occurs at cruise, and vastly improves fuel consumption), but in countries like the UK with very high fuel prices, it is not really an option. Unfortunately, the battery on my camera went flat at the start of the job, so I only have pictures of the later stages, but the job went like this.
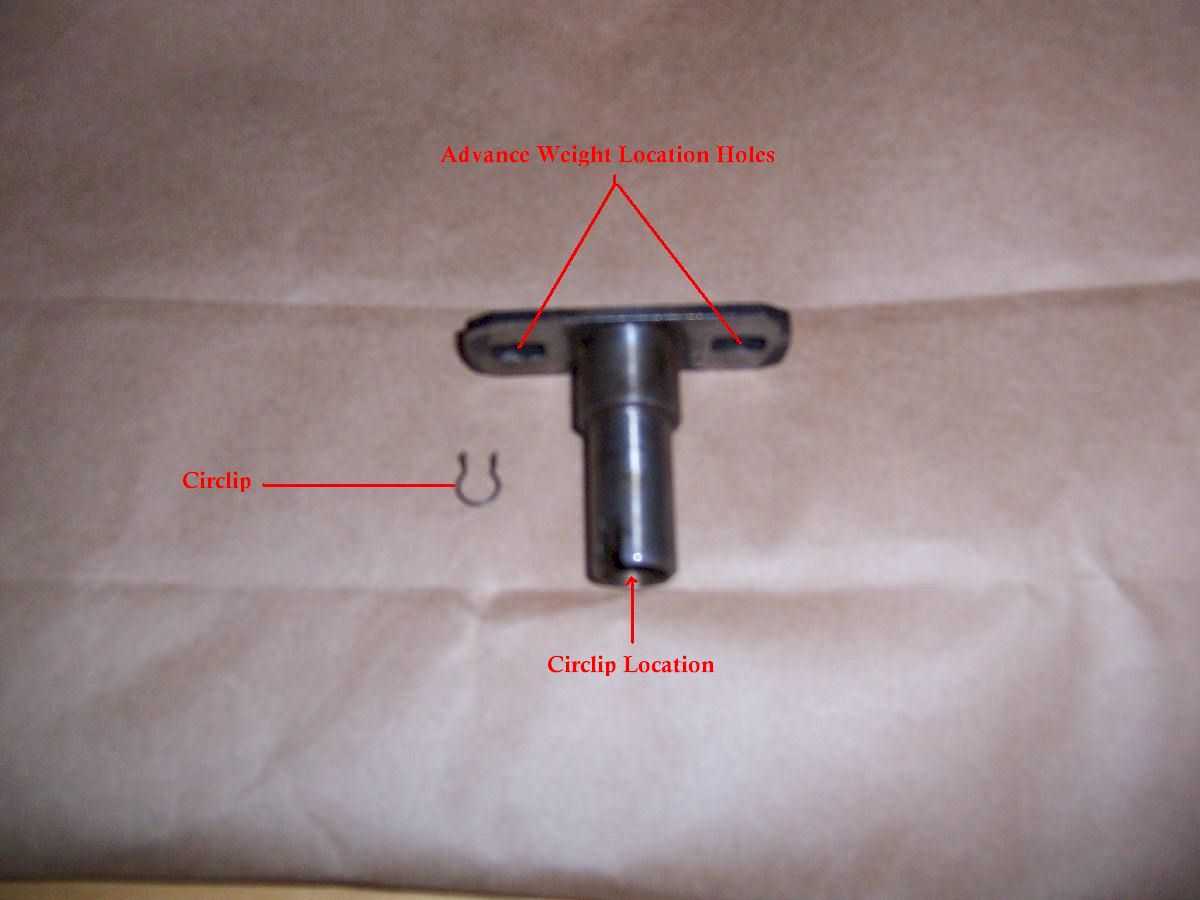
The distributor will now pull out. You can now start dismantling the inside of the distributor as follows:
The next step involves several different operations. Read and make sure you fully understand the information in the article below before starting. To set the ignition system, follow the directions at this in this article.
IGNITION TUNING FOR MAXIMUM
PERFORMANCE:
Tuning for maximum performance assumes the rest of the engine is also suitable for maximum performance. The octane rating of the fuel being used must be sufficient to accommodate the engine's compression ratio. The engine's harmonic balancer must have either degree marks or a timing tape P4529070 which correctly shows up to 60° before top dead centre. The carburettor must be properly jetted so that detonation or surging is not caused by the fuel mixture being too lean when the ignition is at maximum advance. The ignition coil and spark plug wires must be able to deliver sufficient spark to fire the plugs under maximum engine loading. If you are unsure about any of the above, consult the Mopar Performance Engine Modifications Manual. The manual outlines the proper ways to construct a race engine.
If the procedures outlined for maximum
performance are followed and the engine begins to detonate, you must
decrease the timing advances until the detonation is eliminated.
Detonation not only severely reduces power, it also destroys pistons,
rings and rod bearings. DO NOT RUN AN ENGINE THAT IS DETONATING.
Tools required: Timing light,
3/32 Allen wrench, vacuum gauge with
long hose, vacuum source ("Mighty Vac")
and a friend or helper.
1. Set the basic timing for total
mechanical spark advance.
a. Disconnect and plug the vacuum
advance hose.
b. Connect timing light to the
battery and number 1 spark plug wire.
c. Loosen the distributor hold down
clamp so the distributor housing may be rotated by hand.
d. Start the engine and allow it to
warm up fully.
e. Set the idle speed at 2000 RPM.
f. Set the timing according in
accordance with the following: (See Note 1
below on the figures for static timing, and limiting the maximum
mechanical advance)
Engine
Cylinder heads
Max Mechanical Timing
B/RB
Production (Iron)
38° BTDC
B/RB
Stage IV, V (Iron)
38° BTDC
B/RB
Stage VI (Alum)
38° BTDC
B/RB Indy (Alum) 35° BTDC
g. Tighten the distributor hold
down bolt.
h. Reduce the idle to the
original setting, unplug and reconnect the vacuum advance line.
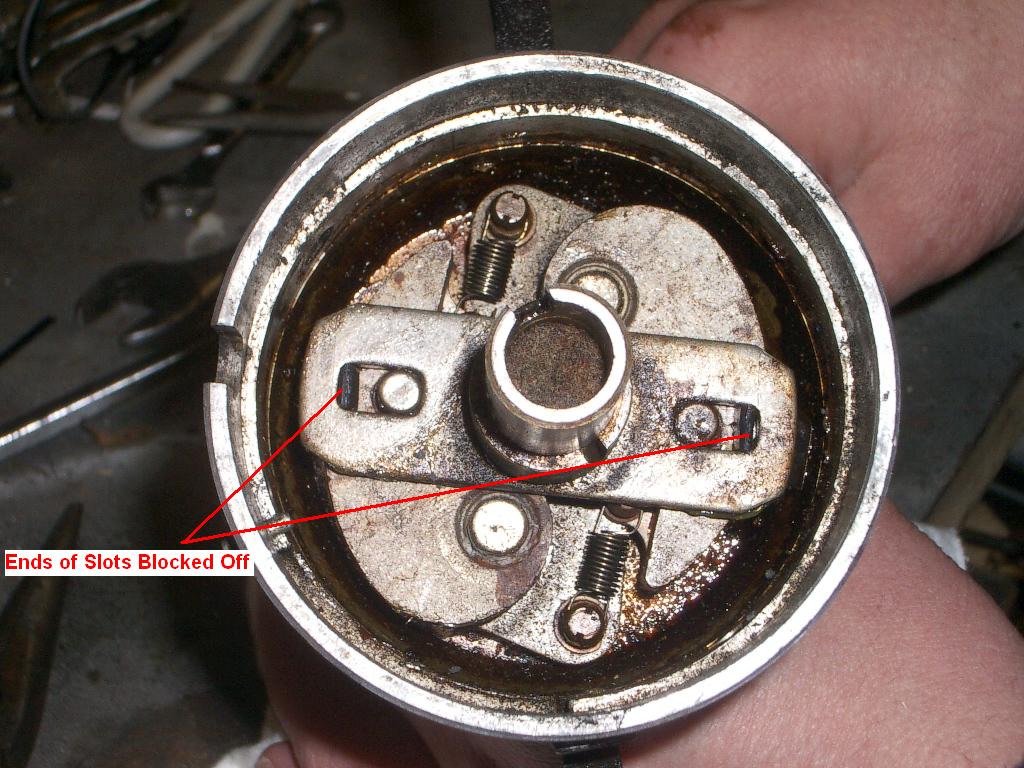
Note 1: JOC member Pete Burton contacted me to say the latest Mopar performance manual lists 32degrees static and 52 degrees total are the maximum you can use with modern unleaded fuels. This pretty much agrees with what we found from experimentation. We restricted the maximum mechanical advance by blocking off the slots in the distributor. We did this with pieces of cable ties glued into position (Figure 4).
Note 2: There is no indication of the age of the article, and it may have been written when high octane leaded fuel was available, so you may need to reduce some of the figures mentioned, especially maximum advance. 52 degrees maximum should be the used on Unleaded-Pump fuel. You may be able to use 58 degrees total on high octane Super Unleaded-Premium fuel. You will now need to road test the car. Pinking is the sign of detonation in the engine and can cause SERIOUS DAMAGE if it is not corrected IMMEDIATELY. You will need a strobe timing light. A digital light will be a great help as with these you set the timing degrees on the gun, then alter the distributor position until the timing marks line up with the pointer. This is the opposite of the old guns where the flash rate was fixed, and you altered the distributor so the timing marks moved away from the pointer. The digital gun also has the ability to show you the maximum amount of advance you have, and at what RPM. Make sure during the testing that the engine is fully warmed up, and that you cover all ranges of driving, i.e. pulling away from idle, full power, hill starts with the engine under heavy load, etc. Make sure you back off IMMEDIATELY you hear pinking, and reduce the amount of advance you have. Now proceed to adjustable distributor |
|
|