|
|
|
|
|
|
|
References to LEFT and RIGHT relate to the
passenger door of a RHD car, so right=front, left=rear.
Looking at the door
aperture from the outside there's a fat rubber seal which looks like one
complete piece but it's actually two pieces. There is one large piece
that runs from bottom-left, across the sill (towards the front), up the
"A" post across the top of the door aperture and finishes at the
top-left corner. There's also a short piece that runs vertically from
top-left to bottom-left.
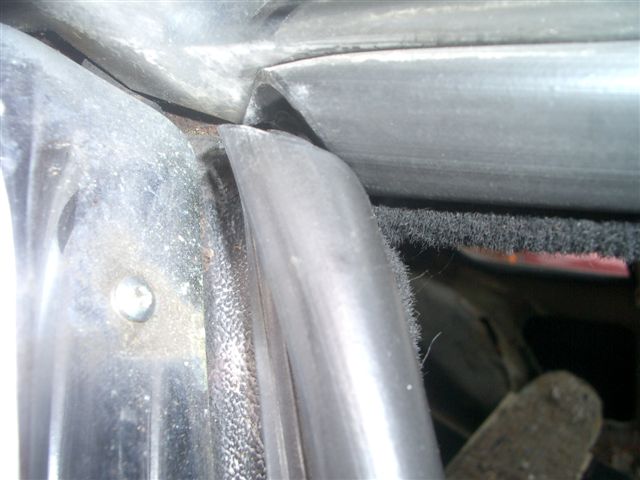
The attached picture "Top-left Junction" shows the
join. It is a mitre cut at about 45 degrees. There is rubber glue which
keeps the two cut edges in alignment but it's tightness of the fit that
keeps the the surfaces pressed together. If there's a gap there will be
wind noise so a dab of back RTV on the INNER side will provide a seal
without being seen. (Note: the picture is of a badly sealed joint, it
should look like one complete flush joint).
Also attached is a picture "Bottom-left Junction";
this shows how the vertical left-hand short piece joins to the start of
the long piece in the bottom left-hand corner. In the picture you'll be
able to see a small right angle metal peg because the junction has been
pulled apart. It is sharp and one half sticks into the bottom rubber and
the other half sticks into the vertical piece. (This is the same
technique used for the rear quarter light windows which are also
multi-piece rubbers that are kept in alignment by the same small
right-angled pegs. They will be rusty when you take the old rubbers out
but keep them (and note their positions as they will be bent to the
correct angle for the corner in which they fit).
The rubber seals around the aperture are a push
fit onto the metal surround and are then held in place with the various
bits of trim that go around the opening. No glue.
The rubber that fits to the door itself is shaped
like a blade with a "T" shaped base. There's a groove around the window
frame and the "T" piece (bottom) fits into the groove and is held at
either bottom end by the door trim (the chrome bits). I've seen a lot of
these where the rubber blade is glued into the door channel but I don't
think it's necessary (and indeed an un-glued seal can move a bit with
temperature variances etc. without rippling so I prefer the no-glue
approach). If you look at the end profile of the seal you'll see that
the blade part isn't straight up - it's at a slight angle (see attached
picture "Leaning Blade"). If you look at the top open edge of the door
the top of the blade should lean inwards towards the car. This is so
that there's a positive seal caused by the aperture rubber pushing this
blade outwards at the top as the door is shut. This also acts like a
compressed spring so when you open the door the blade is helping to push
the door open a bit. If the door tends to stick when you try to open
them then the blade is probably pointing outwards so it's the bottom of
the blade that's making the contact and therefore there's no spring
action available and it also jams a bit.
The door blade can either be one complete piece or
there can be a mitre cut at the rear top-left corner. There's lots of
cars with both and both work ok - I recommend one complete piece
approach because this corner is under pressure to open out so even if
the joint is perfect it will come apart at some point.

The rubber seal around the bonnet may well have
been one complete piece but any new ones I've bough always come as two
pieces. The logical thing to do is put one on the left-side and the
other on the right-side and have a junction in the rear-centre
(scuttle/air intake). But this is wrong because that junction invariable
fails because it's where the bonnet comes down and it keeps getting
lifted when the bonnet is opened. It's better to use one piece to go
around the rear section and to cut the other piece and use these to fill
down the front sides (the two junctions will be about half-way down the
bonnet where the small lift springs are. (no photo as this is off my car
currently). A good joint can be made with black RTV (no sticky tape
allowed!). You'll also need to cut small pieces out where the bonnet
catches are. Also cut the UNDERSIDE where the two rear tight corners are
which helps to radius the corner. (fill the cuts with RTV and you won't
get any frayed bits).
Think that's about it, except to say these
seals are simple compared to the rear hatch seals, but that's another
story...
Post Script. Martin Robey are offering pre cut door seals which may save you the hassle https://www.martinrobey.com/jensen/interceptor/interceptor-iii/rubber-seals/15051 https://www.martinrobey.com/jensen/interceptor/interceptor-iii/rubber-seals/15052
|
|
|
|
|